Define Luminaires
We are finally ready to define the luminaires to be used in the project. When working on your own projects you have a variety of sources for luminaire photometric data; the Instabase, our cloud database of manufacturers where you can search and browse, manufacturers websites and your own computer system where you may already have what you need. In this lesson we will simply provide the IES files for you.
IMPORTANT Note: This course uses real luminaire photometric data. While this data was current as of the creation of this publication, be aware that products change rapidly, and this data will be obsolete at some point (not important for this lesson). Always check with the manufacturer directly prior to specification.
- From the Luminaire Toolkit select the Define command.
- Along the top of the Define dialog, click on the Select Browse/Recent. This allows us to locate IES files on our local computer or network.
- Navigate to the data folder you downloaded for this class.
- Open the folder AGi32 Intermediate Interior – IES Files.

- There are two IES files in this folder. You can see their specifics by selecting each one. Window on both to select and bring them back to AGi32 at the same time.
- Both luminaires have photographs and custom symbols associated with the IES files. Open the AGi32 Intermediate Interior – IES Files folder in Windows Explorer and you can see the images (JPG or PNG) and the custom symbol (SYM created in AGi32). Because the files have custom symbols, AGi32’s Smart Symbols dialog does not open and the data is brought straight into the Define dialog where both definitions are instantly ready to use.
The only changes we should make prior to use is the addition of a light loss factor for both luminaires, we can do this in one operation.
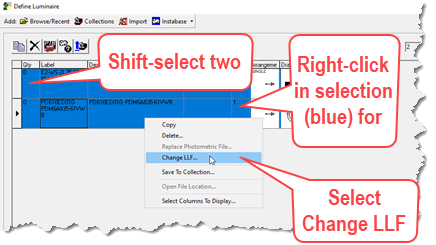
- Shift-select both luminaire lines in the grid as shown below.

- Right-click in the selection area (blue) to open menu.
- Select the Change LLF item.
- Enter 0.8 and click OK. Both LLF's have been changed.
- Close the Define dialog.


